Registering Node to IoT-Ignite
In this tutorial, you will learn how to register a node to IoT-Ignite.
Before registering a node, your application must be connected to IoT-Ignite. If you have not connected it yet, please check this tutorial first.
What is a Node?
A node is an object for grouping similar things. Every sensor or actuator has to be bound a node. IgniteSDK has NodeFactory() API for creating such a node.
You can register a node to IoT-Ignite in three steps:
Step 1: Create Node
private Node mySampleNode;
Define a node instance. Use NodeFactory() to create a object. And assign it to created instance;
  mySampleNode = IotIgniteManager.NodeFactory.createNode(
               /*Unique ID of Node*/
               NODE_ID,
               /* Node label could be unique or not.*/
               NODE_ID,
               /*Node Type is definition for node. If your node is really a physical device you can set as it is.
               * Supported Node Types
               * GENERIC : Default node type. If you dont want to do type based things this will works for you
               * RASPBERRY_PI: Defines node as a Raspberry Pi.
               * If your node is Raspberry Pi and you're going to do RasPi specific things choose this one. (RaspiCam etc.)
               * ARDUINO_YUN:  Defines node as Arduino Yun. Use it for Arduino Yun specific things. (Bridge etc.)*/
               NodeType.GENERIC,
               /** Reserved for later uses. Pass null for now.*/
               null,
               /*Node Listener : Callback for node unregistration.Nodes can be unregistered from enterprise.iot-ignite.com remotely.
               * If your node is unregistered from there -- not your code -- you will receive callback here. */
               this
       );
Step 2: Register Node
After you have successfully created your node, registering it is a simple process.
mySampleNode.register();
register() method returns true if success, otherwise false.
Check these situations and register the node below:
    /**
        * Check node object and register it.
        */
       }
       if(mySampleNode != null ) {

           /**
            * Node is not null and not registered register first and set connection online.
            * If you don't set connection true you can not send data over it.
            *
            */

       Log.i(TAG, mySampleNode.getNodeID() + " created.");
           if (!mySampleNode.isRegistered()) {

               Log.i(TAG, mySampleNode.getNodeID() + " is registering...");

               /**
                * Register node here. If registration successfull make it online.
                */
               if (mySampleNode.register()) {

                   Log.i(TAG, mySampleNode.getNodeID() + " is registered successfully.");
               }
           } else {

               /**
                * Node is already registered set connection to true
                */
               Log.i(TAG, mySampleNode.getNodeID() + " has already registered.");
           }
Step 3: Setting Connection State
Connection state of a node is important for monitoring it from developer panel. IoT-Ignite platform only communicates with online nodes. If you have created and registered a node but you have not set its connection status as online, you cannot do anything with it.
Always set your node’s connection to online before using it. Also, don’t forget to set it offline when your application destroyed.
To make the node online use following method:
mySampleNode.setConnected(true, "");
Or you can make it offline when your application closed or destroyed:
mySampleNode.setConnected(false, "Application Destroyed");
/* second parameter is only for information.
Don't necessary but useful for getting info about node. */
IgniteHandler class connects and registers a node to IoT-Ignite.
public class IotIgniteHandler implements ConnectionCallback,NodeListener {

   private static final String TAG = IotIgniteHandler.class.getSimpleName();

   // Static singleton instance
   private static IotIgniteHandler INSTANCE = null;
   private static final long IGNITE_RECONNECT_INTERVAL = 10000L;

   private static final String NODE_ID = "My Example Node";

   private IotIgniteManager mIotIgniteManager;
   private boolean igniteConnected = false;
   private Context appContext;
   private Handler igniteWatchdog = new Handler();

   private Node mySampleNode;

   private Runnable igniteWatchdogRunnable = new Runnable() {
       @Override
       public void run() {

           if(!igniteConnected){
               rebuildIgnite();
               igniteWatchdog.postDelayed(this,IGNITE_RECONNECT_INTERVAL);
               Log.e(TAG,"Ignite is not connected trying to reconnect...");
           }else {
               Log.e(TAG,"Ignite is already connected");
           }
       }
   };

   private IotIgniteHandler(Context context){
       this.appContext = context;
   }

   public static synchronized IotIgniteHandler getInstance(Context appContext){

       if(INSTANCE == null){
           INSTANCE = new IotIgniteHandler(appContext);
       }
       return INSTANCE;

   }

   public void start(){
       startIgniteWatchdog();
   }

   @Override
   public void onConnected() {
       Log.i(TAG,"Ignite Connected");
       // cancel watchdog //
       igniteWatchdog.removeCallbacks(igniteWatchdogRunnable);
       igniteConnected = true;

       Log.i(TAG,"Creating Node : " + NODE_ID);

       mySampleNode = IotIgniteManager.NodeFactory.createNode(
               /*Unique ID of Node*/
               NODE_ID,
               /* Node label could be unique or not.*/
               NODE_ID,
               /*Node Type is definition for node. If your node is really a physical device you can set as it is.
               * Supported Node Types
               * GENERIC : Default node type. If you dont want to do type based things this will works for you
               * RASPBERRY_PI: Defines node as a Raspberry Pi.
               * If your node is Raspberry Pi and you're going to do RasPi specific things choose this one. (RaspiCam etc.)
               * ARDUINO_YUN:  Defines node as Arduino Yun. Use it for Arduino Yun specific things. (Bridge etc.)*/
               NodeType.GENERIC,
               /** Reserved for later uses. Pass null for now.*/
               null,
               /*Node Listener : Callback for node unregistration.Nodes can be unregistered from enterprise.iot-ignite.com remotely.
               * If your node is unregistered from there -- not your code -- you will receive callback here. */
               this
       );


       /**
        * Check node object and register it.
        */
       }
       if(mySampleNode != null ) {

           /**
            * Node is not null and not registered register first and set connection online.
            * If you don't set connection true you can not send data over it.
            *
            */

       Log.i(TAG, mySampleNode.getNodeID() + " created.");
           if (!mySampleNode.isRegistered()) {

               Log.i(TAG, mySampleNode.getNodeID() + " is registering...");

               /**
                * Register node here. If registration successfull make it online.
                */
               if (mySampleNode.register()) {

                   Log.i(TAG, mySampleNode.getNodeID() + " is registered successfully. Setting connection true");
                   mySampleNode.setConnected(true, "");
               }
           } else {

               /**
                * Node is already registered set connection to true
                */
               Log.i(TAG, mySampleNode.getNodeID() + " has already registered. Setting connection true");

               mySampleNode.setConnected(true, "");
           }
   }

   @Override
   public void onDisconnected() {
       Log.i(TAG,"Ignite Disconnected");
       // start watchdog again here.
       igniteConnected = false;
       startIgniteWatchdog();
   }

   /**
    * Connect to iot ignite
    */

   private void rebuildIgnite(){
       try {
           mIotIgniteManager = new IotIgniteManager.Builder()
                   .setConnectionListener(this)
                   .setContext(appContext)
                   .build();
       } catch (UnsupportedVersionException e) {
           Log.e(TAG, "UnsupportedVersionException :" + e);
       }
   }

   /**
    * remove previous callback and setup new watchdog
    */

   private void startIgniteWatchdog(){
       igniteWatchdog.removeCallbacks(igniteWatchdogRunnable);
       igniteWatchdog.postDelayed(igniteWatchdogRunnable,IGNITE_RECONNECT_INTERVAL);

   }

   @Override
   public void onNodeUnregistered(String s) {

   }
}
Use of this class in MainActivity:
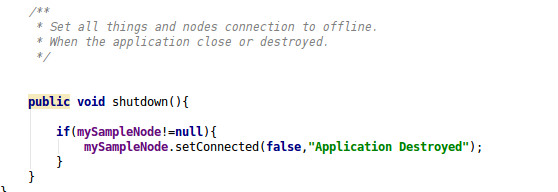
The shutdown() method checks node and sets its connection to false.
public class MainActivity extends Activity {
private static final String TAG ="Sample IoT-Ignite App";
private IotIgniteHandler mIotIgniteHandler;
@Override
protected void onCreate(Bundle savedInstanceState) {
super.onCreate(savedInstanceState);
setContentView(R.layout.activity_main);
/**
* Set IgniteHandler and start.
*/
mIotIgniteHandler = IotIgniteHandler.getInstance(getApplicationContext());
mIotIgniteHandler.start();
}
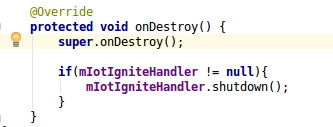
@Override
protected void onDestroy() {
super.onDestroy();
if(mIotIgniteHandler != null){
mIotIgniteHandler.shutdown();
}
}
}
Happy Codings,